Saturday, September 18, 2010

Mech #4

Today I managed to do a few weapon models for the mechs. The player is supposed to be able to completely customize their mech and this includes the weapons. Once again Kai did up some awesome concepts for us to model from. The concepts for these weapons were great and made it easy to model.

Concept Art:

Fig 1.1) Side View

Fig 1.2) Front View

Modelling these weapons did not take too long. Luckily most of the weapons were kept as a combination of basic shapes which made it easier to model them. This weapons will attach to various weapon points on each mech. 

3D Models:

Fig 2.1) Missile Launchers (4 and 6 pack)

Fig 2.2) Rocket Launcher

Fig 2.3) Rail guns

These models still have to be checked by Gordon, but I am happy with the way they turned out. My modelling skills have definitely improved since the beginning of the year and I think the quality of my work shows this. That is all I have to show for today. As always feel free to comment, constructive criticism is how we learn after all. Thanks for reading.

Friday, September 17, 2010

Run 'n Gun #2

The past couple weeks have had ups and downs. We have nailed down the visual style we want, we are trying to go for a Matt Hazard look, basic shapes and 'semi-realistic' textures. I started modeling and texturing assets for the game and over the past week I have learnt that texturing is not my strong point. So I modeled a couple assets and passed them on to Cameron to edit and texture the way he wanted. Luckily his texturing skills are a lot better than mine which makes things easier on me.

Dan has finished modeling and texturing the main character and it seems to have turned out according to what the group wanted. So I have been given the task of rigging and animating the character. The hero needs a few various animations assigned to it, run, sprint, shoot, jump, fall and death animations to be specific.

But before I can animate it I had to rig and skin the character. Finally I got to attempt to rig a full human character. I had some problems rigging the arms in order for them to bend right but managed to fix this problem. The scene was looking really messy so in order to correct this I made groups for everything, mesh, rig, controllers and IKHandles. This made things easier to find and select. I had problems with getting the orientation of the arm controllers to match with the joints, but found a solution by moving the joints and model into a straight line which helped get everything oriented the same way.I found that rigging and setting up controllers for the upper body is a lot more complicated than for the lower body.

Rigging:
Fig 1.1) Rig and Controller Setup

Fig 1.2) Character with Controllers

The character is skinned, but I have not yet weighted it correctly. First I will create a short animation to test the rig in-game and make sure it works. If this goes well then I will start to correct the weighting and animate the character further. If everything goes according to plan I should be able to start animating the character later this week.

We a planning on using motion capture as well as keyframe animation for this project. I so I will be checking with my motion capture teacher on Monday to make sure this rig setup will work properly in Motion Builder. For the next couple weeks I will be going through tutorials and getting to grips with Motion Builder as an animation and motion capture tool. In the mean time I will be using 'placeholder' animation (probably keyframed) until we can get into the motion capture studio (I believe we will be in the studio within the next couple weeks).

That's all I have got for you today. Planning on getting some more work done this weekend and hopefully get ahead of schedule for once. As always feel free to leave any comments or even words of encouragement if you'd like. Thanks for reading.

Mech #3

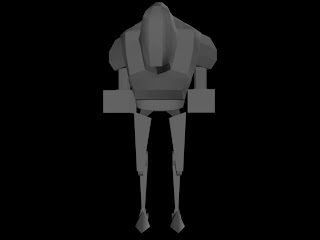
This week I carried on with modelling, rigging and animating another mech. Kai had already done up a few concepts and we all chose which one we wanted to try complete. I chose a rather strangely structure mech, the legs remind me of a pair of bird legs. Once again I modelled, rigged and animated this mech.

The concept art for this mech was once again great, it is really great having a concept artist like Kai.

Concept Art:
Fig 1.1) Front and Side View

I had to change up a thing here and there to get the model in 3d to look and 'feel' right. I had to make changes for some of the joints to get them to look functional. After discussing it with Gordon, I also decided I would leave the legs straight instead of bringing the feet closer together like in the concept.

3D Models:

Fig 2.1) Front View

Fig 2.2) Side View

Fig 2.3) Perspective View

I have started to get use to rigging now, especially for legs. I managed to rig this mech very quickly and easily compared to the rest. I did a pretty basic leg setup, a joint for each rotational point and an IKhandle from the hip to ankle. Again, I did not have to rig the upper body of this mech as it will rotate according to the player. The only down side to this rig setup is that I don't have as much control over the rotational amounts of the bones in-between the hip and ankle.

Rigging:

Fig 3.1) Rig Setup

With this rig setup it was easier to animate than I thought it would be. I still have to check with Gordan if he is pleased with the movement this rig setup allows. I am pleased with the result I have achieved although I think there is room for improvement.

Animation:


That is it the last mech I will be doing for now. I will be moving on to do a few weapon models and hopefully get them ready for this next week.

As always, thanks for reading and feel free to comment (or criticize if you really must). Thanks.

Monday, September 13, 2010

Mech #2

I have been given a second mech to work on. Dan Deppe had already modeled it from another one of Kai's concepts, so I just had to rig and animate it. I had some trouble figuring out a way to rig it to get decent results due to the legs being an awkward design, but with some help from Dan we managed to find a easy solution. We decided to rig the legs just like a normal pair of human legs and just skin the sections of legs to the right joints. This worked out great and was a lot easy than we thought.

Rig and Controllers
Fig 1) Rig and controller setup

Animation
Animation 1) Walk cycle

Animating this mech was great as well, I didn't have any problems with it. I managed to get a decent walk cycle going in no time and Gordon was really surprised and happy with the result. This was a great confidence booster for me as well. It showed me that I actually know what I am doing when it comes to animation and am heading in the right direction to becoming an game animator.

Sunday, September 12, 2010

Mech #1

So over the past couple weeks I have been working on a top secret Mech game. I cant really say much about the game itself, but this is what I can tell you. The player can join one of two teams of mechs. The mechs are fully customizable from body parts to weapons. And the last thing I can say is that you get to blow things up. To sum it up, it's going to be one awesome mech game!

I have been given the tasks of modeling, rigging and animating the mechs. I have been modeling the mechs according to Kai Hulme's concept art which has been great and makes life a lot easier. I had to tweak a couple things from the concepts to get the model to look right and functional in 3D.

Concept Art:
Fig 1.1) Front and Side View

Fig 1.2) Perspective View


3D Models:

Fig 2.1) Front View

Fig 2.2) Side View

Fig 2.3) Perspective View
This project has also given me a chance to learn how to rig models and set up controllers. The rigging is very basic so it makes is less intimidating and gives me a great learning curve and foundation to get to know the process and steps involved. Since the only part of the mech that has to be animated for now is the legs, it makes things a lot easier to deal with. Basically I have got a joint for every pivot where the mech's legs can rotate. The mech I have been working on has human like legs so rigging it was simple, a joint for the waist, hips/thighs, knees, ankles and foot with and IKhandle attached from the hip to ankle. This is like most biped rigs are set up.

Rigging:

Fig 3.1) Rig Setup

Using this rig, I have animated a walk cycle for this mech. This is the first bit of animation I've gotten the chance to do for the year. I had to be careful with how much I moved the legs because I didn't want and clipping to happen. I had a problem where the knees of the mech would snap just after the foot hit the ground and managed to solve this by shortening the stride of the walk. I think I managed to get a pleasing result for this walk cycle.

Animation:
Animation 1.1) Walk Cycle

And that's it for now. I believe I have achieved the desired result and I am pleased with my effort. Feel free to leave any comments or constructive criticism, thanks.